Thoughts on Preserving Leaf Samples for DNA Isolation
Aug 04, 2019
By the time I set off on the field trip this summer it had already been over 4 years since my last one. I mention this to point out that I had largely forgotten my experience on what the best practices were and how not to screw up. You can already tell where this is going.
For geneticists doing field work on plants, the ultimate goal is to be able to isolate high quality DNA from dried leaves. Once the leaf is off the plant/tree, things start going downhill pretty fast. In order to stop the process of DNA degradation, the leaf must be dried rapidly. One of the best methods for drying the leaves is using color-indicating silica-gel beads. These mainly come in two varieties. The orange indicating beads turn green when they have absorbed moisture, whereas the blue indicating beads turn white.
Before embarking on my trip, I read the excellent article by Tyler Smith alongwith the addendum by Kathryn Turner. Despite this, I made a few mistakes which resulted in suboptimal performance during my first collection trip. For example, I used roughly 1/10th of a cup of silica beads in a ziplock per sample. This would have probably been fine had I limited the amount of leaf surface area. But more often than not, I stuffed 2 or more leaves in the ziplock. The silica can only draw moisture at a certain rate. This led to many of the collected leaves looking like the following:

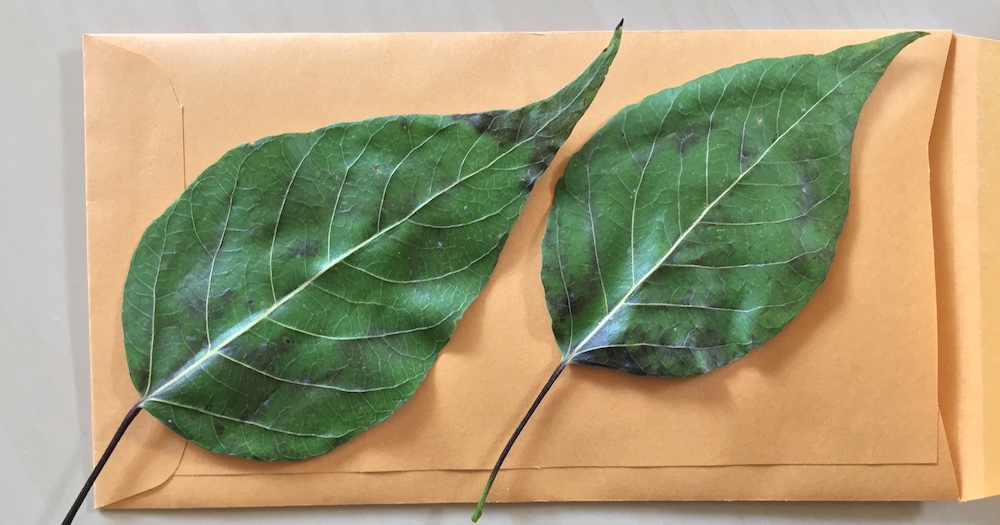
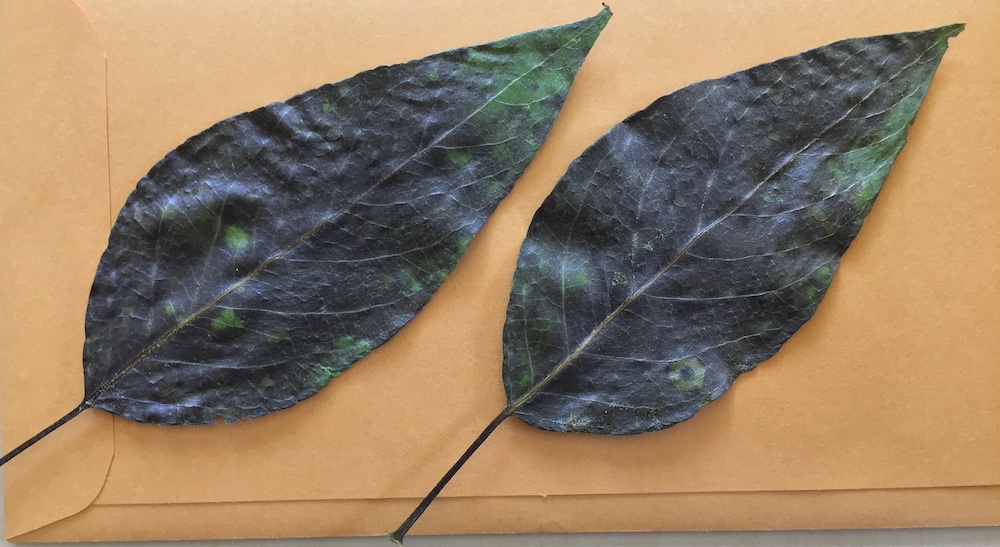


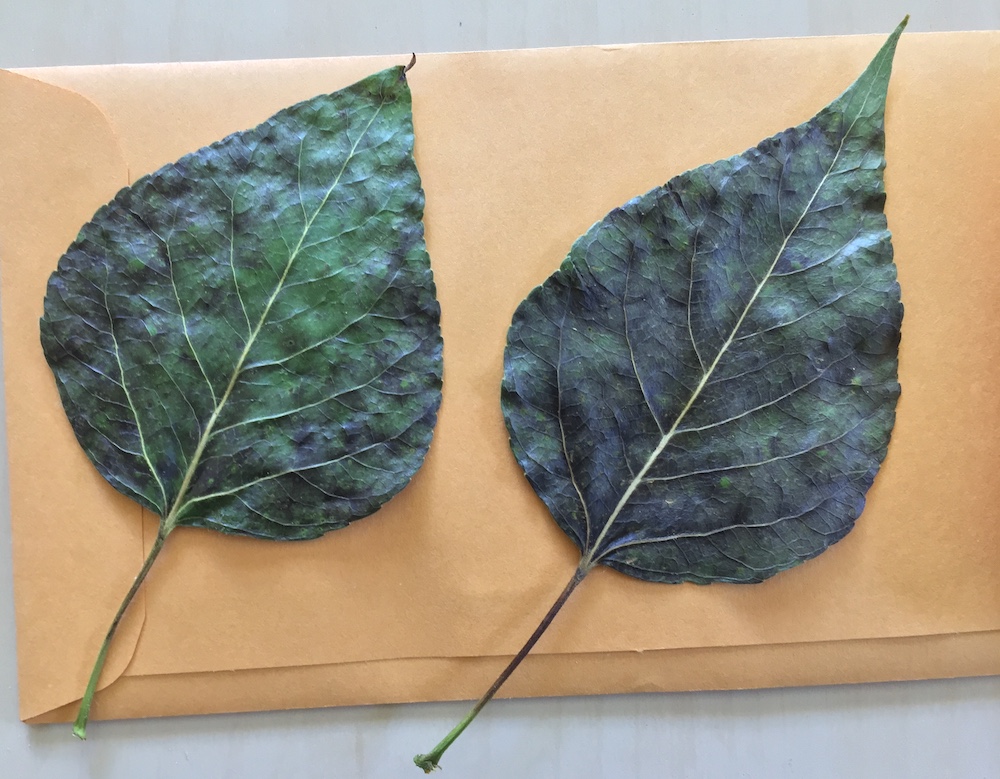
I consider the first two of these as reasonable and others as useless. Of course it remains to be seen whether reasonable can actually yield some high quality DNA, but chances are that they won’t. Based on this experience and after speaking with Kathryn Turner, I have modified my collection protocol and have a few tidbits of wisdom to offer. Using this protocol, I have been able to dry my leaves fast enough. I still had some losses, but over 95% of the samples have turned out good.
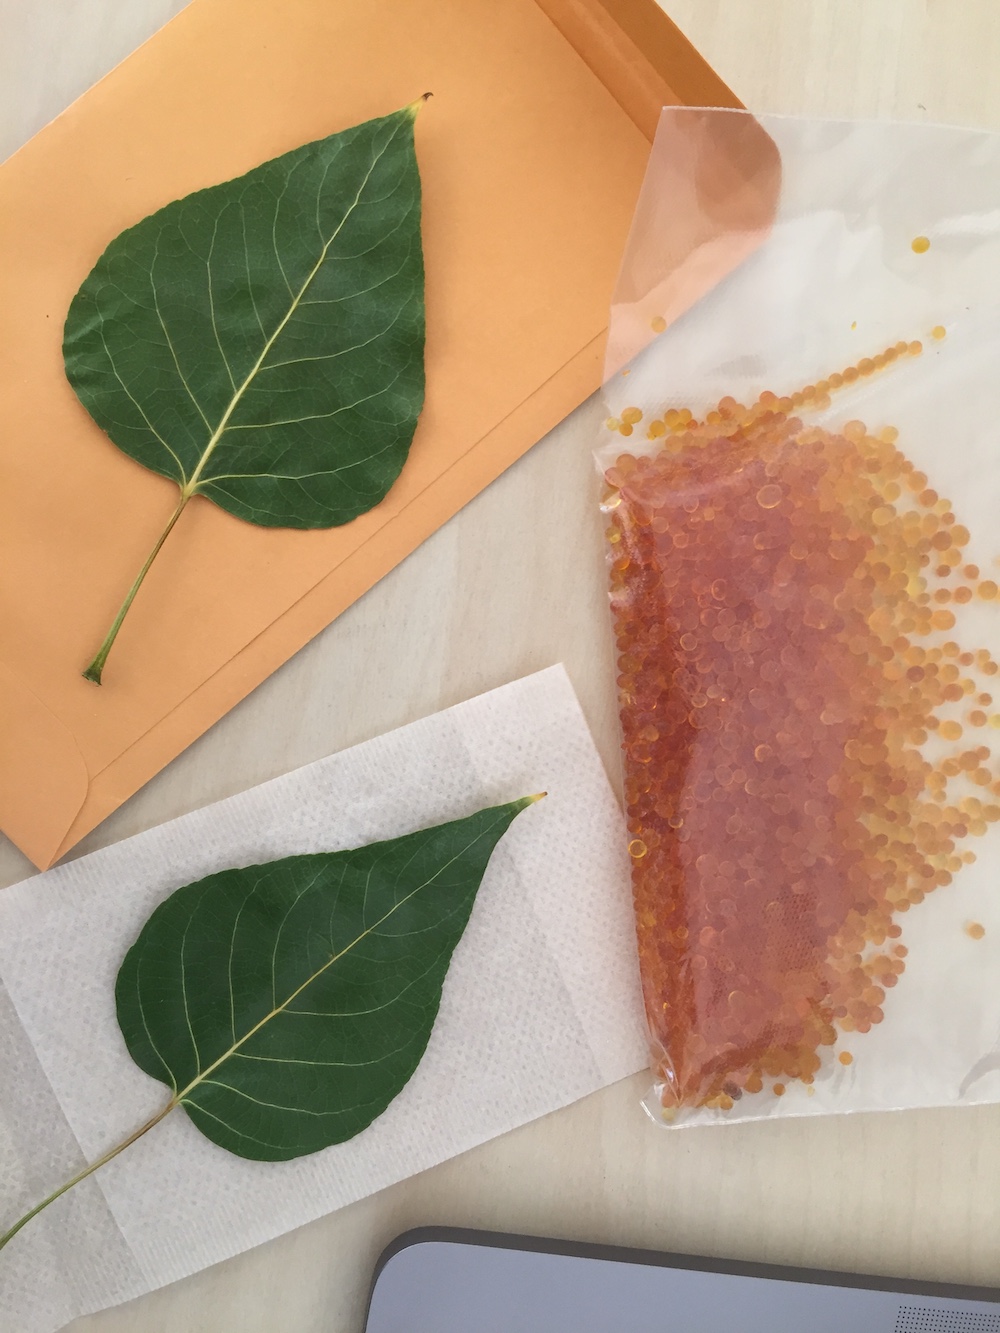
Here is what I would expect a leaf to look like when its dried properly. As Tyler mentions in his blog, if you twist a leaf like this, it will shatter (which means it is well dried).
Ingredients you will need
-
Manila paper envelopes 6” x 9” (I use these)
-
Silica gel beads (2-4mm; I use these)
-
Tea bags (also, 6” x 9”; I use these)
-
Freezer quart ziplocks (I use these)
Before the Field Trip
It’s best to try out what works before you begin your collections. Go out and collect a few leaves of the same species as your study organism. Make sure to collect only fully grown leaves. If you collect immature leaves, they won’t dry properly. Then set up a drying experiment with multiple iterations. A few examples are below:
-
Prepare multiple ziplock bags with 1/8th cup of silica gel (don’t expose silca to air for too long)
-
One leaf in manila envelop goes into ziplock
-
One leaf in tea bag goes into ziplock
-
One leaf in each of paper envelope and tea bag together go into a ziplock
-
Remove as much air as you can from the ziplock before you seal it shut (this is especially important if there is a lot of ambient moisture at the collection site; furthermore it helps keep silica beads from moving around too much)
-
Try to move the beads so they are resting directly against the leaf/leaves
-
If you are wondering whether it is really necessary to remove air from the ziplock, take a look at this discussion from biology.stackexchange and another one from chemistry.stackexchange. Neither of these actually provide a direct answer to my question, but I stand by my suggestion of removing the air.
Every 12 hours, open each ziplock and observe how the leaves are drying and take notes. I would imagine that single leaf ziplocks would dry faster than double leaf ziplocks. Within 36 hours, you should get a pretty clear idea as to what works best.
In the Field
The most efficient protocol in the field is the one that allows you to collect most samples in a day. I have found that when working as a team of two people, we can collect about 40 samples comfortably if we work all day long. This of course depends on how far apart you want the samples to be. If you will be collecting multiple samples within walking distance from each other, it’s best to press them inside a herbarium sheet book on the site and then process them all at once when you come back to the vehicle. That way you don’t have to carry out silica, ziplocks and other paraphernalia to the site. In this type of scenario, my protocol was as follows:
- Person 1
- Collects 3 or more leaves and places them in the herbarium sheet notebook
- Person 2
- Records GPS coordinates: I use date to name the samples e.g.
0724001through0724040. - Takes multiple photographs, then note down sample name and associated picture numbers in the notebook
- Records GPS coordinates: I use date to name the samples e.g.
- Back at the vehicle
- Person 1 places one leaf inside plant press
- Person 2 writes sample name on the envelope, places one leaf each in the envelope and tea bag
- Person 1 prepares ziplock with 1/8th cup of silica, Person 2 drops leaves in the ziplock and seals it shut.
- Within the next 24 hours
- Person 1 checks status of the pressed leaf and changes out herbarium sheet if necessary
- Person 2 checks status of leaves in ziplock and changes out or adds more silica if necessary
This protocol has worked for me, but your mileage may vary. The drying rate will depend upon size and thickness of leaves, quality of silica gel beads you will get and the weather. If leaves are wet in the field, don’t forget to blot any water using a paper towel before drying.
If you have any comments or questions about this page, please leave me a message.
This page will be updated after I have had a chance to extract DNA from these samples.